This cake isn't cakey. That probably sounds strange, but I mean that it's not your average birthday cake with layers of buttercream. It's a dense chocolaty flourless cake that isn't a cop out, and is best served with creme anglaise or fresh berries.
It's not just chocolate wither. There's vanilla, espresso, salt, and cinnamon going on there too. You don't taste them all separately, though. All of these additions share flavor notes with the chocolate, and just make the cake taste even more chocolatey. I like to use Valrhona for these because it has a more intense chocolatey flavor than my usual baking favorite, Scharffen Berger, which is sweeter with a little bit more fruit.
If you have a favorite brand, though go ahead and use that. I just prefer the less fruity flavor because the darkness of the Valrhona ties in better with the earthy flavor additions.
Deep Chocolate Cake
10 oz bittersweet chocolate, chopped
1 1/2 sticks unsalted butter, diced
5 large eggs
3/4 cup sugar
1/2 tsp vanilla extract
1/2 tsp instant espresso
1/4 tsp cinnamon
pinch of salt
Preheat the oven to 350ºF. Grease a 9 inch cake pan and dust with cocoa powder, tapping out the extra. In a bowl, beat the eggs with the sugar, and add the vanilla, salt, and cinnamon.
In a small saucepan or microwave safe bowl, melt the butter, and add the espresso powder, then add the chocolate to the hot butter, and stir until melted and smooth.
Slowly drizzle the melted chocolate into the eggs, whisking the whole time.
Pour the batter into the prepared pan and cover with a sheet of tin foil. Put the pan in a roasting pan and fill 1/2 way up the side with boiling water.
Bake the cake for an hour to an hour and15 minutes, or until the cake is set on top. Cool in the pan for 5 minutes before turning out onto a cooling rack and cooling to room temperature.
Showing posts with label easy. Show all posts
Tuesday, February 19, 2013
Sunday, October 7, 2012
S'more Pie, Dorm Style
Sometimes you need to simplify. Whether it's because you don't have the time, energy, or even the kitchen.
A friend if mine just turned 18 in her first month of college.
She had new friends to celebrate with but no cake. A birthday without a cake is hardly a birthday at all, in my opinion, so I had to make one.
It was actually a pie, but sometimes you just have to sacrifice.
This is not a glory cake(pie) it's as simple as it gets, made with a lot of chemical-sweet packaged products. It's good though. Super sweet and bit tastes like childhood. So simplify and celebrate!!
S'mores Pie
1 graham cracker crust (premade or from scratch)
1 jar marshmallow fluff
1 1/2 cups whipped topping, thawed
4 oz semisweet chocolate, chopped or chips
1/2 cup half and half (stolen from the dining hall is best)
In a microwave, heat the half and half for 2-3 minutes, until almost boiling. Add the chocolate pieces and allow them to stand for 2 minutes. Stir to combine and melt the chocolate into the half and half.
Pour the ganache into the pie crust and chill in the fridge for 2 hours, until the chocolate has set.
In a bowl, gently fold the marshmallow fluff into the whipped topping.
Evenly spread the marshmallow mixture over the ganache and crust.
Add candles, sing, and enjoy!
A friend if mine just turned 18 in her first month of college.
She had new friends to celebrate with but no cake. A birthday without a cake is hardly a birthday at all, in my opinion, so I had to make one.
It was actually a pie, but sometimes you just have to sacrifice.
This is not a glory cake(pie) it's as simple as it gets, made with a lot of chemical-sweet packaged products. It's good though. Super sweet and bit tastes like childhood. So simplify and celebrate!!
S'mores Pie
1 graham cracker crust (premade or from scratch)
1 jar marshmallow fluff
1 1/2 cups whipped topping, thawed
4 oz semisweet chocolate, chopped or chips
1/2 cup half and half (stolen from the dining hall is best)
In a microwave, heat the half and half for 2-3 minutes, until almost boiling. Add the chocolate pieces and allow them to stand for 2 minutes. Stir to combine and melt the chocolate into the half and half.
Pour the ganache into the pie crust and chill in the fridge for 2 hours, until the chocolate has set.
In a bowl, gently fold the marshmallow fluff into the whipped topping.
Evenly spread the marshmallow mixture over the ganache and crust.
Add candles, sing, and enjoy!
Labels:
birthday,
chocolate,
college,
college cooking,
dorm,
easy,
freshman,
graham crackers,
marshmallow,
no bake,
pie,
quick,
s'mores
Thursday, August 16, 2012
Whole Wheat Pita Bread
I know, it's strange how much bread I've been baking in August.
Bread is my de-stresser, my therapy, my physical outlet (I firmly believe of the throwing of dough on the counter)

I made 2 different types of bread this morning-to-afternoon.
Whole wheat pita, and cranberry walnut bread, both are to be gifted away.
There's something very grandmotherly about giving somebody a loaf (or stack) of bread for a gift. Unlike brownies or cookies, nobody can assume it was made from a mix or prepackaged dough, it has a certain heft that makes me feel like it actually counts as a gift.
Now that I'm finished singing the praises of loaves of bread, let's sing about flatbread, specifically the pita.
Boy, oh, boy, the pita! Firm, bubbled, pocketed vessel of hummus.
Baked into chips, used to clean out the bowl of spicy soups, simple to make, and so fun to shape from little balls into rounds.
These hold flavors beautifully, garlic, herbs, even a little parmesan cheese can be added to the top or middle of the rounds for a more flavorful bread, but that'll be another post. For now, we'll focus on plain pita, hummus' favorite friend.
Whole Wheat Pita
Makes 16 (2 oz) pitas
3 1/2 cups white whole wheat flour
3/4 cup warm water (105-110ºF)
1 tbs dry active yeast
2 tsp sugar
2 tsp salt
2 tbs olive oil, divided
In a small bowl or measuring cup, mix the water, sugar, and yeast. Let the mixture proof for 5 minutes, or until foamy. If the mixture does not foam, repeat this step with new yeast.
In a large bowl, mix the flour and salt. Add the yeast mixture and 1 Tbs of olive oil to the flour.
Mix with a fork until thoroughly combines (about 3 minutes)
Turn the dough out onto a floured surface and continue kneading for about 6 more minutes, until the dough is smooth and elastic.
Form the dough into a ball and coat with the remaining oil. Place back in the mixing bowl, and allow to sit, covered with a warm kitchen towel, for about an hour and a half, or until doubled in size.
Once risen, preheat the oven to 500ºF and turn the dough out onto a clean work surface.
Divide the dough into quarters, careful not to press the air out of the dough.
Flatten each quarter into a square, about 1 inch thick, and cut the square into quarters.
Roll the 16 pieces of dough into balls. Cover the balls with a kitchen towel and allow to rise again until slightly risen, about 20 minutes.
After the second rising, roll the dough into 6 inch rounds on a floured surface and place on a heated pizza stone or bottom of an overturned baking sheet.
Cook the pitas for about 2 minutes, or until puffed.
Eat with hummus, bake into chips, use to soak up soup; enjoy them in whatever way you please!
Bread is my de-stresser, my therapy, my physical outlet (I firmly believe of the throwing of dough on the counter)
I made 2 different types of bread this morning-to-afternoon.
Whole wheat pita, and cranberry walnut bread, both are to be gifted away.
There's something very grandmotherly about giving somebody a loaf (or stack) of bread for a gift. Unlike brownies or cookies, nobody can assume it was made from a mix or prepackaged dough, it has a certain heft that makes me feel like it actually counts as a gift.
Now that I'm finished singing the praises of loaves of bread, let's sing about flatbread, specifically the pita.
Boy, oh, boy, the pita! Firm, bubbled, pocketed vessel of hummus.
Baked into chips, used to clean out the bowl of spicy soups, simple to make, and so fun to shape from little balls into rounds.
These hold flavors beautifully, garlic, herbs, even a little parmesan cheese can be added to the top or middle of the rounds for a more flavorful bread, but that'll be another post. For now, we'll focus on plain pita, hummus' favorite friend.
Whole Wheat Pita
Makes 16 (2 oz) pitas
3 1/2 cups white whole wheat flour
3/4 cup warm water (105-110ºF)
1 tbs dry active yeast
2 tsp sugar
2 tsp salt
2 tbs olive oil, divided
In a small bowl or measuring cup, mix the water, sugar, and yeast. Let the mixture proof for 5 minutes, or until foamy. If the mixture does not foam, repeat this step with new yeast.
In a large bowl, mix the flour and salt. Add the yeast mixture and 1 Tbs of olive oil to the flour.
Mix with a fork until thoroughly combines (about 3 minutes)
Turn the dough out onto a floured surface and continue kneading for about 6 more minutes, until the dough is smooth and elastic.
Form the dough into a ball and coat with the remaining oil. Place back in the mixing bowl, and allow to sit, covered with a warm kitchen towel, for about an hour and a half, or until doubled in size.
Once risen, preheat the oven to 500ºF and turn the dough out onto a clean work surface.
Divide the dough into quarters, careful not to press the air out of the dough.
Flatten each quarter into a square, about 1 inch thick, and cut the square into quarters.
Roll the 16 pieces of dough into balls. Cover the balls with a kitchen towel and allow to rise again until slightly risen, about 20 minutes.
After the second rising, roll the dough into 6 inch rounds on a floured surface and place on a heated pizza stone or bottom of an overturned baking sheet.
Cook the pitas for about 2 minutes, or until puffed.
Eat with hummus, bake into chips, use to soak up soup; enjoy them in whatever way you please!
Labels:
bread,
cooking,
easy,
healthy,
olive oil,
pita,
rustic,
savory,
seasonings,
sunday sweeties,
sundaysweeties,
whole wheat,
yeast
Friday, August 10, 2012
Pollo in Pomodoro
I was planning on making grilled chicken with fennel for dinner. For me, this dish is just summer on a plate, so I figured it would be perfect for early August.
Today, it was 65º and rainy. Today was fall all the way, without a bit of summer in the air. Tonight's dinner called for something tender, cooked for at least an hour, preferably stewed in a spicy tomato gravy.
I spend my falls and winters making soups, and stews, and curries. This is my favorite late summer version, as it takes advantage of all the fresh summer tomatoes, is filling on cold nights, but is still light and super healthy, filled with fresh veggies, low fat white meat, and herbs.
Pollo in Pomodoro
Serves 4
olive oil
4 chicken drumsticks (skinned)
4 chicken thighs (skinned)
3 cloves of garlic, minced
1 stalk of celery, chopped
1/2 red onion, chopped
1 medium carrot, chopped
red pepper flakes to taste (1/2-1 tsp)
2 cups crushed tomatoes
2 cups vegetable stock
3 sprigs of fresh rosemary, chopped fine
1 tbs chopped basil
salt and pepper
Heat a deep, heavy bottomed pot or Dutch oven, over medium heat, when hot, add olive oil. Season both sides of the chicken with salt and pepper and add them to the hot pot. Brown the chicken on both sides, 6-7 minutes each.
Remove the chicken from the pan and set aside. Add the onions, carrots, and celery to the pot, along with a pinch of salt and pepper. Cook until the vegetables begin to sweat, about 3 minutes.
Add the garlic and pepper flakes and cook until you can smell the garlic, about 3 minutes more.
Add the crushed tomato, and stock to the pan. Use a wooden spoon to deglaze the bottom of the pan.
Bring the mixture to a boil, then reduce to a simmer for 25 minutes. Taste and season with salt and pepper as needed
Add the chicken, basil, and rosemary to the sauce and add enough water or chicken stock to almost cover the chicken. Bring the sauce to a boil, then reduce to a simmer for 25 minutes to a half hour, until the sauce comes half way up the chicken.
Serve with polenta or roasted sweet garlic roasted zucchini.
Enjoy!
Wednesday, August 8, 2012
Heirloom Tomato and Peach Jam
Ketchup has to be one of my favorite things. Not just one of my favorite foods, but one of my favorite things.
It's right up there with sweaters, lipstick, and puppies.
I put it on everything from fried potatoes, to baked potatoes, to mashed potatoes, to freezer waffles.
Bet you weren't expecting that last one.
I've made berry ketchup, I've made berry jam.
And now, I've made tomato peach jam. It's essentially a way grown up version of ketchup and is amazing on everything from toast to meatloaf.
It's sweet and tart and as spicy as you want it to be.
Its healthy, with only herbs, tomatoes, peaches, vinegar, salt, pepper, chilie flakes, and 2 tbs of honey. Yep, "ketchup" with only 2 tbs of sweetener. That's what the peaches are for, kids.
This jam literally tastes like summer: ripe peaches, garden fresh tomatoes, it doesn't get any better.
It's the perfect way to use up all the weird looking tomatoes from the garden, or the ones that split in the summer heat, because it cooks for about an hour.
Tomato and Peach Jam
Makes 1 quart of jam
1 Pound tomatoes, roughly chopped
2 large peaches, chopped slightly smaller than the tomatoes
2 Tbs honey
1/4 cup balsamic vinegar
1 1/2 Tbs chopped basil
1/2-1 tsp chili flakes
Salt and pepper to taste
Chop your peaches and tomatoes and toss in a medium, high sided pot. Add the vinegar, honey, and a small pinch each of salt and fresh ground pepper.
Heat the mixture on medium, stirring, until it comes to a boil.
Cover and turn down to a simmer for about 25 minutes, stirring every so often to make sure all the fruit is breaking down evenly.
After 25 minutes, mix in half of the basil and chili flakes. Taste the mixture and add more salt and pepper.
Simmer, uncovered, for about 40 minutes, or until the liquid has dissolved by half, and the fruit is broken down. Stir the mixture every 4 minutes.
Mix in the rest of the basil, cover the pot, and remove from the heat.
Allow the jam to come down to room temperature before pouring into an air tight container or jar.
The mixture will keep in the fridge for a week or so.
Enjoy!
It's right up there with sweaters, lipstick, and puppies.
I put it on everything from fried potatoes, to baked potatoes, to mashed potatoes, to freezer waffles.
Bet you weren't expecting that last one.
I've made berry ketchup, I've made berry jam.
And now, I've made tomato peach jam. It's essentially a way grown up version of ketchup and is amazing on everything from toast to meatloaf.
It's sweet and tart and as spicy as you want it to be.
Its healthy, with only herbs, tomatoes, peaches, vinegar, salt, pepper, chilie flakes, and 2 tbs of honey. Yep, "ketchup" with only 2 tbs of sweetener. That's what the peaches are for, kids.
This jam literally tastes like summer: ripe peaches, garden fresh tomatoes, it doesn't get any better.
It's the perfect way to use up all the weird looking tomatoes from the garden, or the ones that split in the summer heat, because it cooks for about an hour.
Tomato and Peach Jam
Makes 1 quart of jam
1 Pound tomatoes, roughly chopped
2 large peaches, chopped slightly smaller than the tomatoes
2 Tbs honey
1/4 cup balsamic vinegar
1 1/2 Tbs chopped basil
1/2-1 tsp chili flakes
Salt and pepper to taste
Chop your peaches and tomatoes and toss in a medium, high sided pot. Add the vinegar, honey, and a small pinch each of salt and fresh ground pepper.
Heat the mixture on medium, stirring, until it comes to a boil.
Cover and turn down to a simmer for about 25 minutes, stirring every so often to make sure all the fruit is breaking down evenly.
After 25 minutes, mix in half of the basil and chili flakes. Taste the mixture and add more salt and pepper.
Simmer, uncovered, for about 40 minutes, or until the liquid has dissolved by half, and the fruit is broken down. Stir the mixture every 4 minutes.
Mix in the rest of the basil, cover the pot, and remove from the heat.
Allow the jam to come down to room temperature before pouring into an air tight container or jar.
The mixture will keep in the fridge for a week or so.
Enjoy!
Friday, July 27, 2012
Busy Week Birthday Brownies
I have four days left at school. Four short, busy, test filled, celebratory days. I have spent more than 400 days at my school, and now I only have 4 left. It's sort of crazy.
These are not 4 days of Popsicle licking and movie watching, like they were when I only had 4 more days of kindergarten or even eighth grade. These are 4 days or finals, concerts, and projects that I have put off for far too long. It's also my friend's birthday.
I cannot possibly let a friend's birthday pass without sharing a treat-usually chocolate-with them, and Emma is the last person whose treat should ever be forgotten, and certainly the last person you would dare present with anything other than chocolate. I wanted to make her a Butterfinger type chocolate bar but these bars take hours, or days and involve a whole lot of chocolate tempering. I other words, they are not ideal when you only have about 20 minutes free for the next 7 days.
I have a small arsenal of recipes that I can make in less than 20 minutes, most of them using five ingredients or less. I decided to make Emma one of my favorite recipes from this collection, that also happens to be one of the chocolatyist. Nutella Brownies.
If you're really a brownie purist, you may call these brownie bites because they're baked in cupcake liners, but to me, these are brownies because they're a real dessert, not at all like the store bought 2-bite variety. These are gooey, nutty, chocolaty, simple, and soooo good. I especially like them topped with some nocciola ice cream, but this batch is for Emma, so I must resist.
Nutella Brownies
1 cups Nutella
1 c minus 2 Tbs AP flour
4 large eggs
Pinch of salt
A whole bunch of chocolate chips
(I used about 1 1/2 cups, which may sound like overkill but was really really good.)
Preheat your oven to 350ºF. Line a 12 muffin tin with liners.
In a bowl, mix eggs and Nutella until completely combined, add salt and flour 1 cup at a time, and mix until thoroughly incorporated. Fold in the chocolate chips. Divide evenly between the muffin cups and bake for 10 minutes. They should be completely jiggle-less, but an inserted toothpick should come out covered with damp, fudgy crumbs.
These are not 4 days of Popsicle licking and movie watching, like they were when I only had 4 more days of kindergarten or even eighth grade. These are 4 days or finals, concerts, and projects that I have put off for far too long. It's also my friend's birthday.
I cannot possibly let a friend's birthday pass without sharing a treat-usually chocolate-with them, and Emma is the last person whose treat should ever be forgotten, and certainly the last person you would dare present with anything other than chocolate. I wanted to make her a Butterfinger type chocolate bar but these bars take hours, or days and involve a whole lot of chocolate tempering. I other words, they are not ideal when you only have about 20 minutes free for the next 7 days.
I have a small arsenal of recipes that I can make in less than 20 minutes, most of them using five ingredients or less. I decided to make Emma one of my favorite recipes from this collection, that also happens to be one of the chocolatyist. Nutella Brownies.
Gotta love silicon baking cups-no messy muffin tins!
If you're really a brownie purist, you may call these brownie bites because they're baked in cupcake liners, but to me, these are brownies because they're a real dessert, not at all like the store bought 2-bite variety. These are gooey, nutty, chocolaty, simple, and soooo good. I especially like them topped with some nocciola ice cream, but this batch is for Emma, so I must resist.
Nutella Brownies
1 cups Nutella
1 c minus 2 Tbs AP flour
4 large eggs
Pinch of salt
A whole bunch of chocolate chips
(I used about 1 1/2 cups, which may sound like overkill but was really really good.)
Preheat your oven to 350ºF. Line a 12 muffin tin with liners.
In a bowl, mix eggs and Nutella until completely combined, add salt and flour 1 cup at a time, and mix until thoroughly incorporated. Fold in the chocolate chips. Divide evenly between the muffin cups and bake for 10 minutes. They should be completely jiggle-less, but an inserted toothpick should come out covered with damp, fudgy crumbs.
Thursday, May 31, 2012
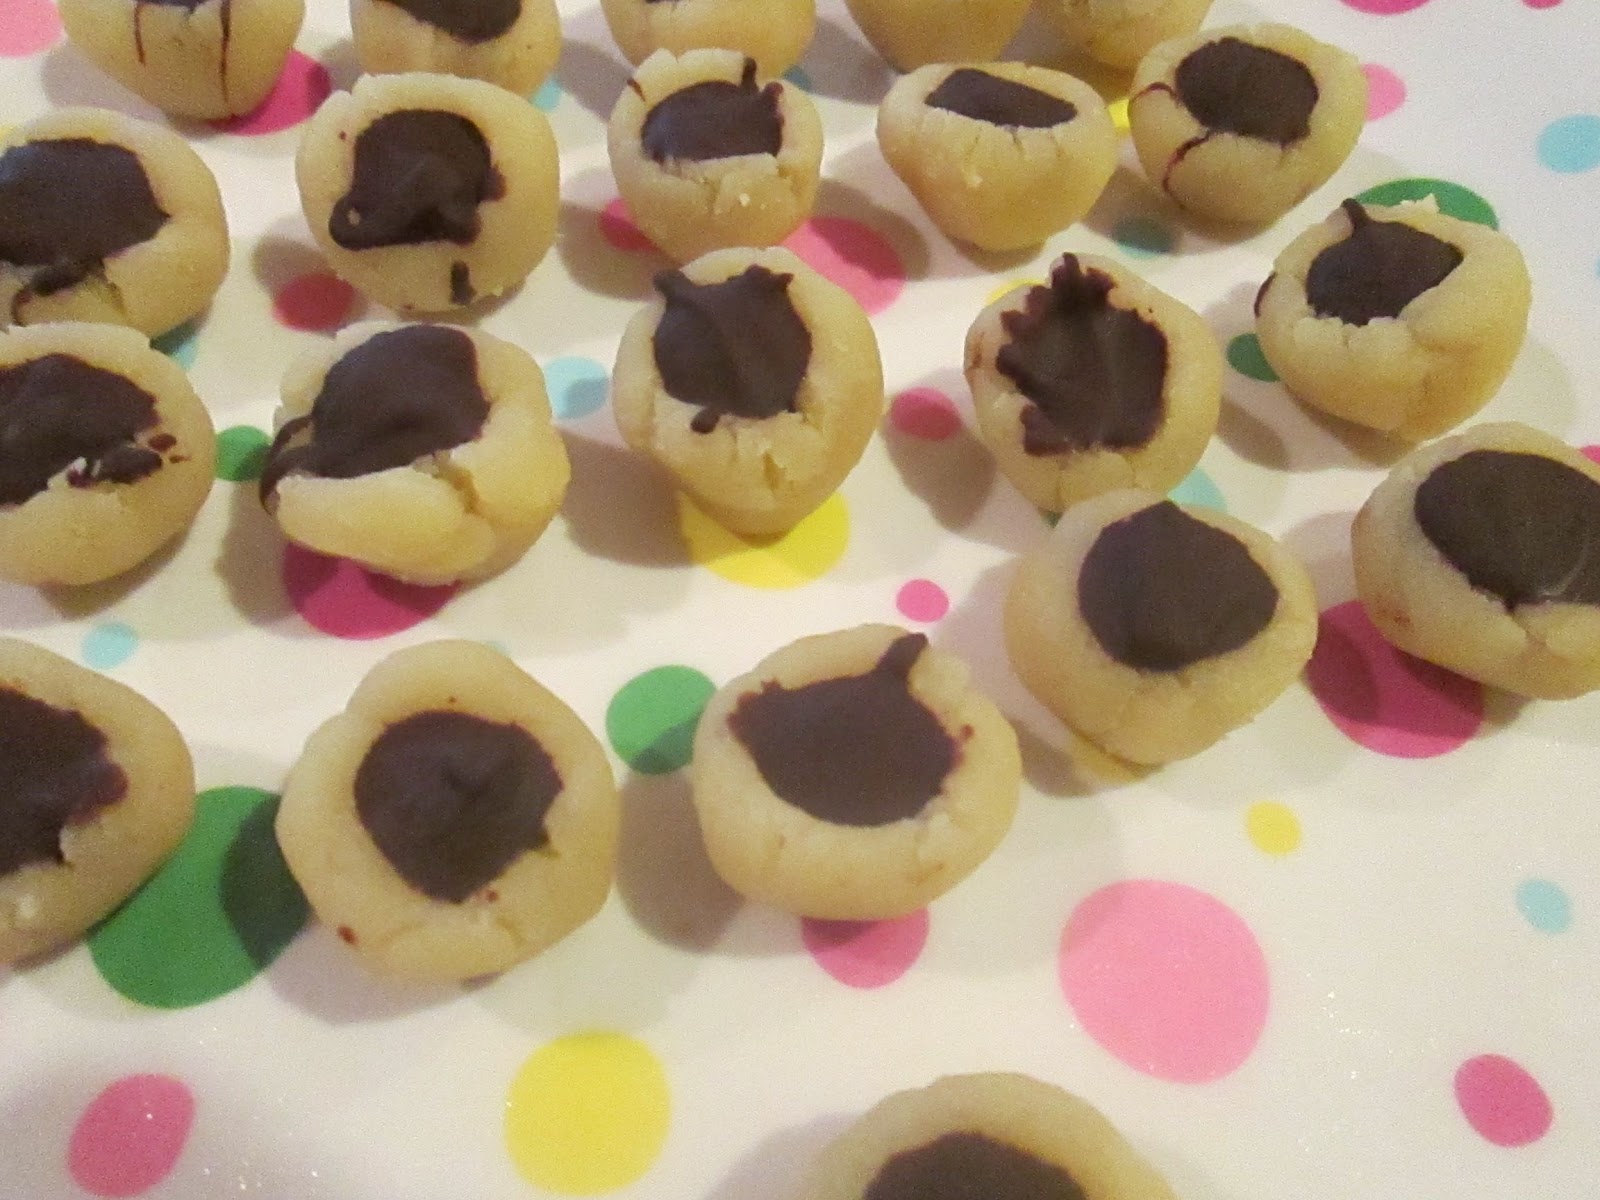
Quick Dark Chocolate Marzipan
Sometimes, you need to make something really quick, but you still need it to be really good and special. This is where marzipan comes in. I have shared a recipe for a long form marzipan before, but I'm currently in the process of stocking up on hand made food gifts for the seemingly endless number of graduation parties I have this summer, so I don't have the time or patience to be grinding almonds and cooking egg whites to perfection.
This is not a very sweet marzipan, and it leans on the side of stickiness, but that's how I like mine, all almond flavor with a sharp contrast between the texture of the chocolate filling and the marzipan casing.
You can make these with any type of chocolate filling, but I like a dark chocolate with a fairly low percentage of cocoa solids. I generally go with about 60% cocoa. This may seem a little strange, but it's meant to balance out the pure nuttiness of the marzipan. Think of it this way, if you need a bitter chocolate, your marzipan is too sweet.
(I know, I need to get some more plates for photos)
Quick Marzipan with Dark Chocolate
Makes 30 filed marzipan cups
8 oz Almond paste (not marzipan)
1 Tbs light corn syrup
1/2 tsp almond extract
3.5 oz dark chocolate
In break the almond paste into peces a bowl. With a hand mixer, beat the almond paste until smooth. Add the corn syrup and and almond extract continue beating until it forms a smooth dough. If the mix is too dry, add a teaspoon of corn syrup. You want a slightly sticky dough, so if the dough is too wet, add a couple tablespoons of powdered sugar.
Form into small balls and make a dip in the center of each with your finger tip, to make a small bowl shape.
Melt and temper the chocolate. Use a small spoon or squeeze bottle to fill the marzipan bowls to the top with chocolate. Chill in the refrigerator until the chocolate is completely set and the marzipan is dry, about 2 to three hours or over night. Package, share, enjoy!
Labels:
almonds,
blog,
chocolate,
dark chocolate,
easy,
gifts,
marzipan,
petit,
quick,
sunday sweeties,
Sweeties
Strawberry Balsamic Popsicles
I remember the very first time I had strawberries and balsamic vinegar. I was probably eight years old and my dad had read about the new crazy combination in Bon Appetit magazine. While I have always been a lover of balsamic vinegar (The reduced stuff is by far the best ice cream topping in the world--yes, even better than fudge or caramel or both) the mix of berries, vinegar and pepper was not very attractive to my eight year old self.
But then I tried it. Oh my goodness was it amazing! My dad added some sugar and let the berries soak up the vinegar for about an hour before we dug in to the bowl of ruby colored berries.
This is still one of my favorite combinations, and even though I absolutely hate black pepper, it is very very necessary in this recipe. It perfectly balances the sharpness of the vinegar and berries. Oh, and if you can, use the ripest strawberries you can find, they balance the sweet and savory combination without the addition of too much sugar, so you get more of the pure berry and vinegar flavor.
Strawberry Balsamic Pops
1 1/2 cups ripe strawberries, hulled and stemmed
2-4 Tbs sugar
1/2 Tbs Fresh ground black pepper (finer is better)
2 1/2 Tbs good balsamic vinegar
In a blender or bowl with a hand mixer, blend the strawberries and sugar until it forms a chunky liquid (hard to explain, but the picture above is more descriptive). Add the pepper and vinegar and mix well. Portion into your popsicle molds and freeze until solid, 6 hours or overnight.
But then I tried it. Oh my goodness was it amazing! My dad added some sugar and let the berries soak up the vinegar for about an hour before we dug in to the bowl of ruby colored berries.
This is still one of my favorite combinations, and even though I absolutely hate black pepper, it is very very necessary in this recipe. It perfectly balances the sharpness of the vinegar and berries. Oh, and if you can, use the ripest strawberries you can find, they balance the sweet and savory combination without the addition of too much sugar, so you get more of the pure berry and vinegar flavor.
Strawberry Balsamic Pops
1 1/2 cups ripe strawberries, hulled and stemmed
2-4 Tbs sugar
1/2 Tbs Fresh ground black pepper (finer is better)
2 1/2 Tbs good balsamic vinegar
In a blender or bowl with a hand mixer, blend the strawberries and sugar until it forms a chunky liquid (hard to explain, but the picture above is more descriptive). Add the pepper and vinegar and mix well. Portion into your popsicle molds and freeze until solid, 6 hours or overnight.
Wednesday, May 30, 2012
Chai Coconut Milk Popsicles
Today beings the week of popsicles. I have a thing for week long challenges and even more of a thing for frozen deliciousness on a stick. I'm pretty darned excited, if you couldn't already tell.
This is probably the simplest of all the recipes. It's literally just brewing tea, as long as you use a good quality tea. If you've only got low quality tea lying around, add a cinnamon stick and a couple cardamom pods to the tea when it's on the stove to boil. This will perk it up a little so it tastes more like a rich tea pop and not just frozen sugar water.
What makes this even better is that on day 8, there's a special surprise for you. But we'll leave that for day 8, because it's a surprise!
Chai Coconut Popsicles
2 cups water
4 chai tea bags
1 cup coconut milk (I used Lite)
3 Tbs honey
Put the tea bags in a pot of kettle and cover with the water. Bring the tea to a boil and then remve from the heat. Cover and let steep for 3 to 5 minutes more. Mix in the honey and coconut milk and cool the mixture to room temperature. Divide the mix between your popsicle molds or cups and freeze.
If you're using paper cups or silicon baking cups, freeze for 1 hour before inserting a stick in the middle, then continue freezing until solid (about 6 hours) If you're using molds, the sticks are usually attached already, but if they're not, just follow the cup method.
Unmold, pop out, or tear away the paper and ENJOY!
This is probably the simplest of all the recipes. It's literally just brewing tea, as long as you use a good quality tea. If you've only got low quality tea lying around, add a cinnamon stick and a couple cardamom pods to the tea when it's on the stove to boil. This will perk it up a little so it tastes more like a rich tea pop and not just frozen sugar water.
What makes this even better is that on day 8, there's a special surprise for you. But we'll leave that for day 8, because it's a surprise!
Chai Coconut Popsicles
2 cups water
4 chai tea bags
1 cup coconut milk (I used Lite)
3 Tbs honey
Put the tea bags in a pot of kettle and cover with the water. Bring the tea to a boil and then remve from the heat. Cover and let steep for 3 to 5 minutes more. Mix in the honey and coconut milk and cool the mixture to room temperature. Divide the mix between your popsicle molds or cups and freeze.
If you're using paper cups or silicon baking cups, freeze for 1 hour before inserting a stick in the middle, then continue freezing until solid (about 6 hours) If you're using molds, the sticks are usually attached already, but if they're not, just follow the cup method.
Unmold, pop out, or tear away the paper and ENJOY!
Labels:
chai,
coconut,
coconut milk,
dessert,
easy,
frozen,
ice pop,
popsicle,
quick,
sunday sweeties,
Sweeties,
tea
Friday, May 25, 2012
Make Boxed Cake Mix Better and Buttercream
It's Memorial Day weekend and even though I posted a cake recipe yesterday, I realize that for most people a 2 day cake isn't really family barbecue material. So here's my super fast recipe for a great cake mix cake and 3 different frostings!
There aren't any pictures because this is more of a guide than a recipe, but I'm sure you'll see pictures of similar recipes soon, especially the frostings.
Making Cake Mix Great:
Pour your cake mix into a bowl.
In a different bowl, mix the eggs called for on the box with 1 extra egg yolk.
Replace the water called for on the box with milk, and add to eggs. Mix to combine.
Add the oil called for on the box (or use melted butter), 1 tsp vanilla extract, and 1 tsp instant espresso for chocolate cake
For an extra rich cake, mix in 1/4 cup yogurt or sour cream.
Mix wet ingredients well.
Add the wet mix to the dry mixture, mix well and bake according to the directions on the box.
Mixing the wet ingredients before adding them to the dry will give you a finer crumb.
Feel free to mix and match the above steps and do what's convenient for you! This recipe gives you a super moist cake.
Favorite Cake Mixes:
Yellow: Betty Crocker Super Moist Yellow cake mix tastes almost exactly like the King Arthur version, but is 1/2 the price!
Chocolate:Duncan Hines Devils Food Cake
White: Betty Crocker Super Moist Cake mix in Vanilla
Frosting: Feel free to dye them patriotic colors
Classic Vanilla Buttercream:
3 cups of powdered sugar
1 cup softened butter cut into large pieces
1 1/2 tsp vanilla extract
2-4 Tbs whipping cream
With a hand mixer, beat the butter and sugar on low, moving up to medium, until they are combined and slightly sandy in texture. Add vanilla, dye, and 2 Tbs cream. Continue beating, moving up to high speed. If the mixture needs thinning, add more cream very gradually. Whip until fluffy
Chocolate Buttercream:
1 pound powdered sugar
1 cup good quality bittersweet chocolate, chopped
1/2 cup softened butter
2-3 Tbs whipping cream
pinch of salt
1 tsp vanilla
1 tsp instant espresso
Melt chocolate gently in a double boiler or the microwave. Set aside to cool for 5 minutes. Dissolve espresso in 2Tbs cream, and add vanilla. Beat the butter, sugar and salt together until well combined, about 3 minutes. Add cream mixture and beat to combine. Slowly add chocolate, raising mixer speed to high, until the frosting reached medium peaks. If the mixture is too warm, cool in the refrigerator after the chocolate is completely incorporated. Whisk again to fluff it up before using.
Summery Mint Buttercream:
3 cups of powdered sugar
1 cup softened butter cut into large pieces
1 tsp mint extract
2-4 Tbs whipping cream
3 Tbs chopped fresh mint leaves
With a hand mixer, beat the butter and sugar on low, moving up to medium, until well combines-- 3 minutes. Add mint extract and 2 Tbs cream. Continue beating, moving up to high speed. If the mixture needs thinning, add more cream very gradually. Beat until desired consistency, then gently fold in chopped mint leaves with a rubber spatula.
There aren't any pictures because this is more of a guide than a recipe, but I'm sure you'll see pictures of similar recipes soon, especially the frostings.
Pour your cake mix into a bowl.
In a different bowl, mix the eggs called for on the box with 1 extra egg yolk.
Replace the water called for on the box with milk, and add to eggs. Mix to combine.
Add the oil called for on the box (or use melted butter), 1 tsp vanilla extract, and 1 tsp instant espresso for chocolate cake
For an extra rich cake, mix in 1/4 cup yogurt or sour cream.
Mix wet ingredients well.
Add the wet mix to the dry mixture, mix well and bake according to the directions on the box.
Mixing the wet ingredients before adding them to the dry will give you a finer crumb.
Feel free to mix and match the above steps and do what's convenient for you! This recipe gives you a super moist cake.
Favorite Cake Mixes:
Yellow: Betty Crocker Super Moist Yellow cake mix tastes almost exactly like the King Arthur version, but is 1/2 the price!
Chocolate:Duncan Hines Devils Food Cake
White: Betty Crocker Super Moist Cake mix in Vanilla
Frosting: Feel free to dye them patriotic colors
Classic Vanilla Buttercream:
3 cups of powdered sugar
1 cup softened butter cut into large pieces
1 1/2 tsp vanilla extract
2-4 Tbs whipping cream
With a hand mixer, beat the butter and sugar on low, moving up to medium, until they are combined and slightly sandy in texture. Add vanilla, dye, and 2 Tbs cream. Continue beating, moving up to high speed. If the mixture needs thinning, add more cream very gradually. Whip until fluffy
Chocolate Buttercream:
1 pound powdered sugar
1 cup good quality bittersweet chocolate, chopped
1/2 cup softened butter
2-3 Tbs whipping cream
pinch of salt
1 tsp vanilla
1 tsp instant espresso
Melt chocolate gently in a double boiler or the microwave. Set aside to cool for 5 minutes. Dissolve espresso in 2Tbs cream, and add vanilla. Beat the butter, sugar and salt together until well combined, about 3 minutes. Add cream mixture and beat to combine. Slowly add chocolate, raising mixer speed to high, until the frosting reached medium peaks. If the mixture is too warm, cool in the refrigerator after the chocolate is completely incorporated. Whisk again to fluff it up before using.
Summery Mint Buttercream:
3 cups of powdered sugar
1 cup softened butter cut into large pieces
1 tsp mint extract
2-4 Tbs whipping cream
3 Tbs chopped fresh mint leaves
With a hand mixer, beat the butter and sugar on low, moving up to medium, until well combines-- 3 minutes. Add mint extract and 2 Tbs cream. Continue beating, moving up to high speed. If the mixture needs thinning, add more cream very gradually. Beat until desired consistency, then gently fold in chopped mint leaves with a rubber spatula.
Subscribe to:
Posts (Atom)