Showing posts with label nut. Show all posts

Tuesday, July 24, 2012

Walnut Butter (cookies)

I've had a revelation.
Some people have them while sitting on solitary rocks in the desert.


Some people have them while sitting in the belly of a whale.
I had mine sitting on the couch with a jar of almond butter and a spoon.
Yep, I'm refined like that.

The revelation was this: I love natural nut butters...I can make natural nut butters...I love making food...I bet I'd love making natural nut butters.
Oh, and my revelation was correct. Since I first did the math, I have fallen in love with making nut butters from scratch, adding unexpected ingredients, and then using those butters as the unexpected ingredient in a whole new recipe. It really makes you feel like you deserve the respect you get when you drop the Made from Scratch title.
These are 2 of the most basic nut butter recipes, but I promise I'll post more soon, and hummus too, because that's essentially just a bean butter (and peanuts are technically beans, so.. yep)
These are like the sophisticated big brother of the peanut butter cookie, not quite as elegant as the almond butter cookies I made a few months back (they're more like the great aunt who's surprisingly trendy) but clearly there's a lot more going on with these guys than there is with their peanut butter companions.
In reality, the only real big difference is that these use a different nut, a couple of slightly different measurements, and a giant food processor. The nut does all the heavy lifting, but go ahead, take credit, you did make the butter after all.

Slightly Seasoned Walnut Butter
Makes about 1 cup 

8 oz of walnuts, peeled and coarsely chopped
Water
Seeds scraped from 1 vanilla bean (or 1 tsp decent vanilla extract)

Soak the walnuts over night in water. This removes any bitterness.
In the morning, preheat your oven to 350ºF and drain your nuts.
Roast the nuts in the oven until dry and slightly fragrant, this should take bout 15 minutes, but check them often and turn them half way through. Do not let them get dark.
Remove the nuts from the oven and cool to room temperature, feel free to keep your oven on if you're going to make the cookies.
Place the nuts in the bowl of your food processor and grind them for a while. At first you'll just have nut mal, but if you keep on scraping down the sides and grinding on and on, you'll end up with a creamy butter. Just before the nuts reach their ideal smoothness (about 13 minutes in) add your vanilla, and continue pulsing and scraping for about another 2 minutes.
Use as you please, I like it in the cookie below.

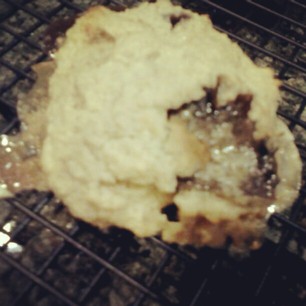
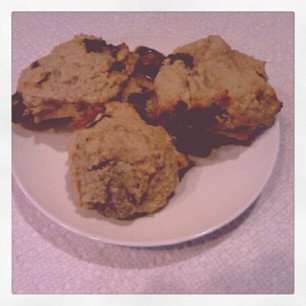
Walnut Butter Cookies
Makes about 30 cookies

1 cup walnut butter (above yield)
1 large egg
2/3 cup packed light brown sugar
1/2 tsp vanilla extract
1 tsp sea salt
2/3 cups AP flour
1 tsp baking powder

Preheat oven to 350ºF and line 2 pans with parchment paper.
In a medium bowl, mix together the first 5 ingredients until well incorporated and almost verging on creamy.
Sift in the flour and baking powder, stirring after every 5 hits or so.
Scoop 1/2 tbs sized balls onto the parchment and space them about 2-2 1/2 inches apart, they have a decent spread.
Bake for about 10 minutes or until they're crisp around the edges but still soft int eh middle.
Enjoy!


Friday, May 25, 2012

FlufferNutter Cookies

My parents make me a grand total of 2 FlufferNutter sandwiches when I was a kid. Both of these 2 sandwiches were for my birthday, and both of them were absolutely amazing. I did not grow up surrounded by sweets, by any stretch of the imagination, which is probably why I am so crazy about them now. Because neither of my parents were really fans of the sweet stuff, both of these sandwiches were adulterated with slices of banana. I'm sure that this was my parent's attempt to make the sandwich resemble an actual meal instead of a dessert, and instill in me a habit of healthy eating, but it sort of had the opposite effect. Instead, it instilled in me a deep love of the combination of peanut butter, marshmallows, and bananas. They have been combined with graham crackers and chocolate in many s'mores, and even found their way into a cookie. A really really good cookie, by the way.

These cookies are made with browned butter and whole wheat pastry flour to really bring out the toffee flavor, and impart a warm flavor that tastes a little like graham crackers. You could totally add a healthy helping of dark chocolate to the mix, something I seriously wish I'd done. Instead, I used chocolate marshmallows, because they were the only ones I had on hand. I found out the hard way that they taste no different from the regular white kind, so I don't recommend spending the extra couple bucks for the brown sort.
The marshmallows will also melt out of the cookies and caramelize on the pan, so make sure you use parchment or a Silpat, and DO NOT overcook these guys, because the caramel surrounding the cookies is one of the best parts.
Mmmmm... Gooey caramelized marshmallow
FlufferNutter Cookies
Makes about 30 cookies

2 cups whole wheat pastry flour
1 1/2 tsp baking powder
1/4 tsp salt
1 stick of butter
1/2 cup creamy peanut butter
1 cup gently packed light brown sugar
1 egg, 1 egg yolk
2 tsp vanilla
2 very ripe bananas, mashed
1 1/2 cups mini marshmallows
1/2 tsp flaked sea salt

Preheat oven to 350ºF, line 2 large (3 normal sized) baking sheets with parchment paper.
Brown the butter by heating, with salt, over medium-low heat until golden flecks start to sink on the bottom. Remove from heat, cool slightly, and add the peanut butter, mix until smooth, and cool completely.
In a medium bowl, cream together the eggs and sugar. Mix in the vanilla and mashed bananas. The mixture will be not quite smooth.
Whisk in cooled butter mixture. Add flour, baking powder, and salt. When the wet and dry ingredients are well combined, gently fold in the marshmallows.
Try adding them in 4 batches. Marshmallows seem to have a weird magnet effect and don't want to spread out from each other if you add them all at once.
Scoop the dough into 1" balls, tucking in any marshmallow pieces that seem to be coming out of the ball, to make sure they don't spread around the pan too much, press down to flatten slightly. Bake on the middle racks for 9-11 minutes, until golden, but still soft. They will start to smell like the marshmallows that kids used to burn at camp after they're cooked about half way. Don't freak out, they're not burning, they're just oozing caramel. But this also means that you'll have to be super careful about the timing. Remember, when in doubt, take them out. Underdone is always, always, always better than overdone.
Just thought I'd throw in another picture, as if you weren't tempted enough already